Integration Component Overview
An integration component is a small application specialized on retrieving/storing objects from/to a service such as Salesforce, Quickbooks, SAP, etc. In most cases a component connects to the service’s API (REST, SOAP, etc) on user’s behalf using the provided credentials. A component may also connect to a Database, an SFTP server, etc. to retrieve or store data.
A component can expose multiple operations to be used in integration flows. As a rule of thumb a component talking to an application through its REST API will expose operations that reflect the endpoints of that API. Let’s explore the integration component for the Petstore as an example. The following screenshot demonstrates an extract from the Petstore API documentation.

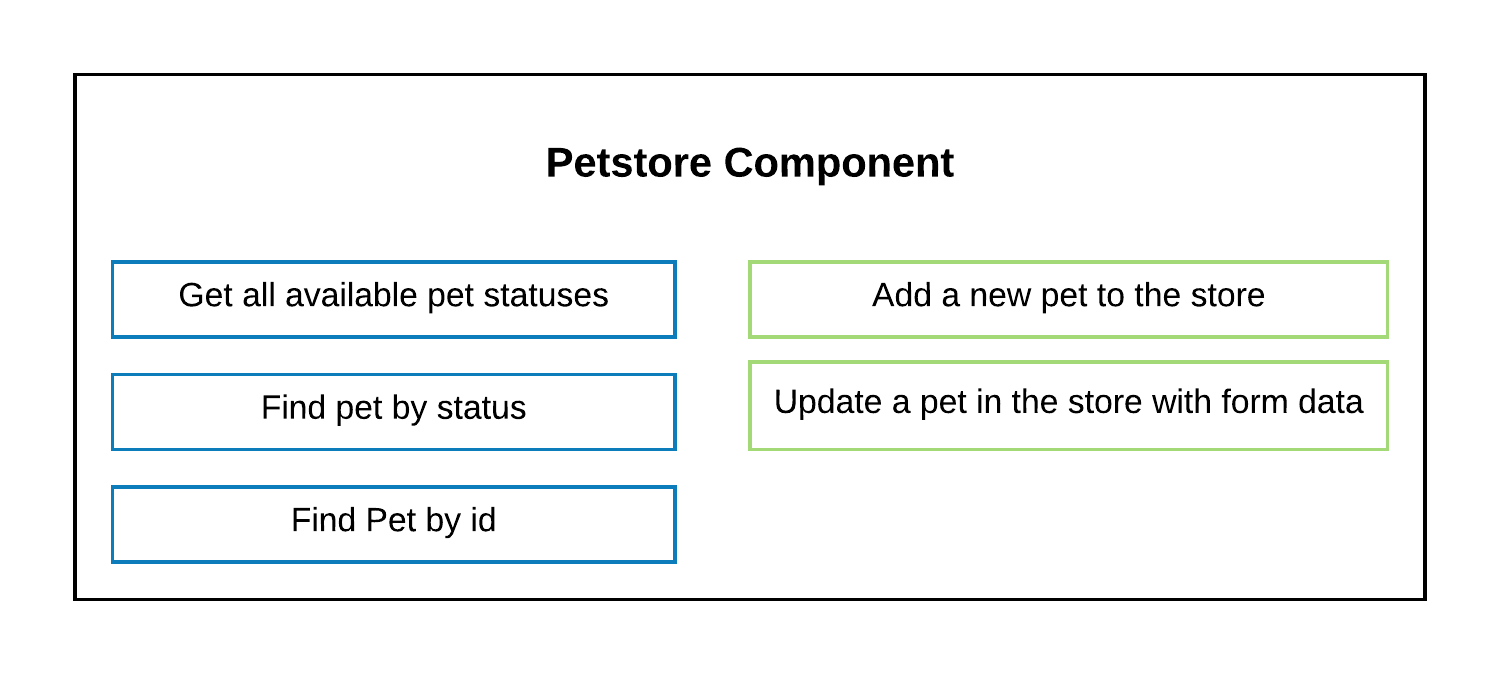
Now if a developer would implement a Petstore component he/she will typically end up with a component as shown in the following diagram.

The diagram above demonstrates a Petstore component consisting of 5 operations.
The 3 operations in blue boxes are called triggers and the 2 operations
in green boxes are called actions. Please note that the color of the
operations in the diagram above reflect the color of the resources in
the screenshot showing Petstore API documentation.
Trigger
A trigger is used to start an integration flow
by exporting data for processing. For that purpose a trigger is monitoring
changes in the source application, e.g. by sending requests to the particular API.
Once changes has been detected the trigger starts the integration flow.
As a rule of thumb any GET resource in a REST API is implemented as trigger
in an integration component.
Action
An action is used to consume data produced by a trigger or another action.
Typically an action inserts objects into target application. That’s why
any writing resource (POST, PUT, etc.) in a REST API will be implemented
as actions in an integration component. For example the
Add a new pet to the store is an action as the corresponding
resource in the Petstore API is accessible through POST method.
Please note that a component developer is not required to cover 100% of the API in his/her component. Typically a developer would implement only those API resources that are required in the current integration project. Indeed the coverage of the APIs in the built-in AVA platform components varies from component to component.
Understanding component’s interaction
An component acts as a black box: its internals are hidden to an integrator. The component exposes the following details only:
- How to authenticate: what data does the component require in order to operate on integrator’s behalf. Please read the details on credentials.
- Consumed input: In order to operate properly a component needs some input data.
- Produced output: For each incoming message a component typically produces an output message.
The following diagram shows the Add a new pet to the store operation from
the Petstore component.

As you can see in the diagram above the Add a new pet to the store operation
requires the Pet interface and provides a PetCreationResponse interface.
In other words, the operation consumes a Pet object and generates a
PetCreationResponse object.
Now that we discussed component’s interfaces let’s see how components can interact with each other using their interfaces. The following diagram illustrates an interaction of two components.

In the diagram above you can see an interaction between two components:
Webhook and Petstore. The Webhook component provides a Payload
interfaces and the Petstore component requires a Pet interface. How
do these two component interact with each other? This is where the Mapper
comes into play. The Mapper is responsible to transform an object into
another one with a given set of transformation rules. In the example above
the Mapper transforms a Payload object into a Pet object before it is
being passed to Petstore component. Mode details on Mapper can be found
here.
Implementing own integration components
The AVA platform provides a set of built-in components to be used right away. Furthermore the platform is open for contributions of custom components. Please read how to build integration components using Node.js or Java programming languages.
Managing components with API calls
You can create component repositories, update and delete components, get all information related to them and much more using corresponding API calls. In the process of using the components, there are often situations where you will find it easier, and sometimes necessary, to use functions that API endpoints provides. For this reason, we recommend that you familiarize yourself with all call options, which are presented in detail in the API documentation.