Managing user roles in a contract
This document explains what roles and permissions are and how to set roles in the UI.
Roles and permissions
A tenant admin can control user rights in a tenant by configuring user roles. A role is a user attribute that defines a set of permissions for the user. Tenant roles define permissions for tenant management, contract roles define permissions for contract management, and workspace roles define permissions for workspace management.
The default tenant role is:
- Tenant-Admin - Users with this role can manage tenants, contracts and users.
Please note that with
global.tenant.edit_rolespermission you can usePATCH /v2/tenants/:tenantId/rolesAPI call which allows to create a new role with permissions in a tenant scope. Please usePATCH /v2/tenants/{tenant_id}/members/{user_id}API endpoint to grante any role from the tenant’s scope to any user.
The default contract roles are:
- Owner - Users with this role can edit contract members list, create and delete workspaces, and see all workspaces in the contract.
- Admin - Users with this role can create and delete workspaces, see all workspaces in the contract, make changes into repository, and edit development team.
- Member Users with this role can create workspaces in the contract.
The default workspace roles are:
- Owner - Users with this role can edit the workspace, edit flows, start/stop flows, change flows from/to real-time/ordinary status, and edit credentials in a workspace.
- Admin - Users with this role have the same permission set as Owner plus recipe creation and modification.
- Integrator - Users with this role can edit flows, start/stop flows, change flows from/to real-time/ordinary, and edit credentials. They can also create and edit recipes.
- Guest - Users with this role can browse the workspace.
Note that a full set of contract permissions does not automatically mean a full set of permissions for every workspace. A contract Admin may be a Guest in a certain workspace.
Please note that you can always get the list of available permissions using an API call. This endpoint is available to all the platforms’ users.
Setting user roles in Workspace
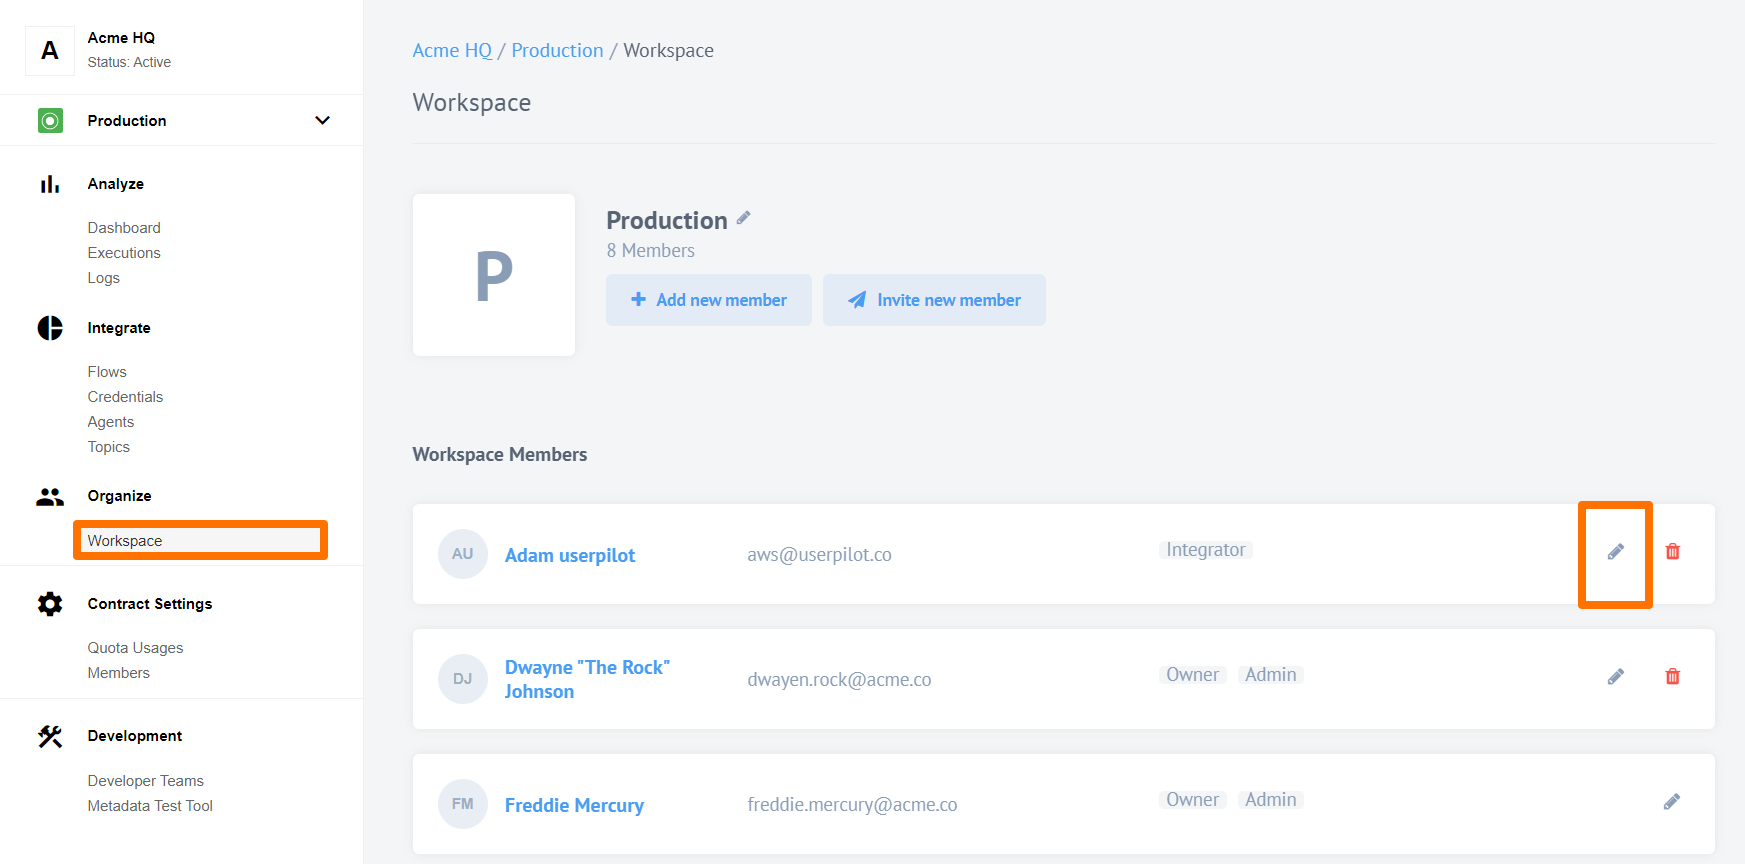
As a workspace Owner or Admin you can modify user roles in the workspace by navigating to Workspace in navigation menu and clicking Edit member’s role:
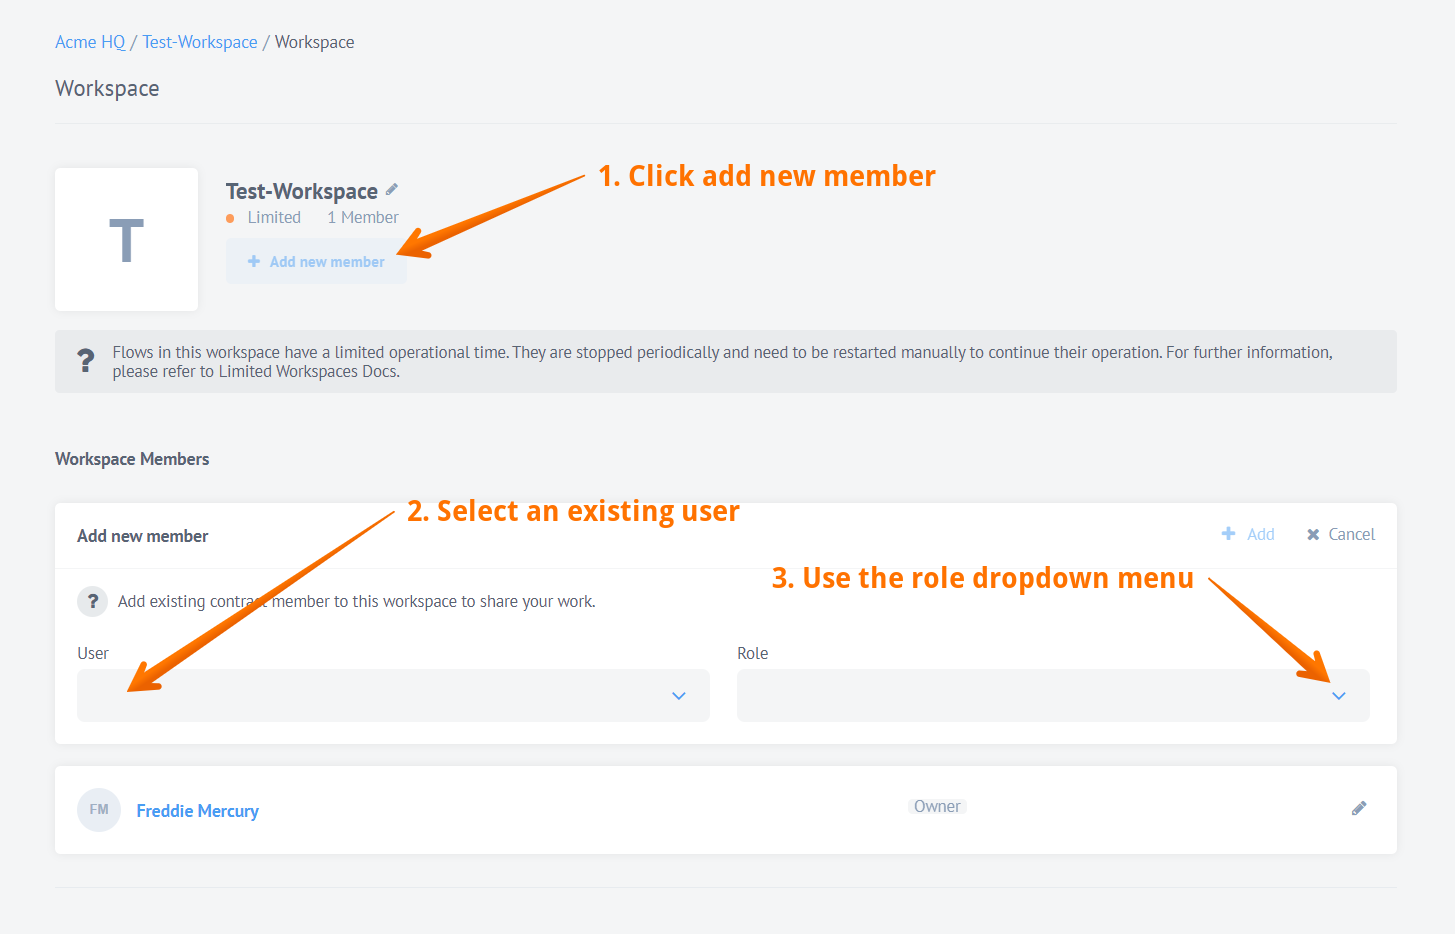
As a workspace Owner or Admin you can set the user role while adding them to the workspace. Click Add new member, select an existing user and use the Role drop-down menu.
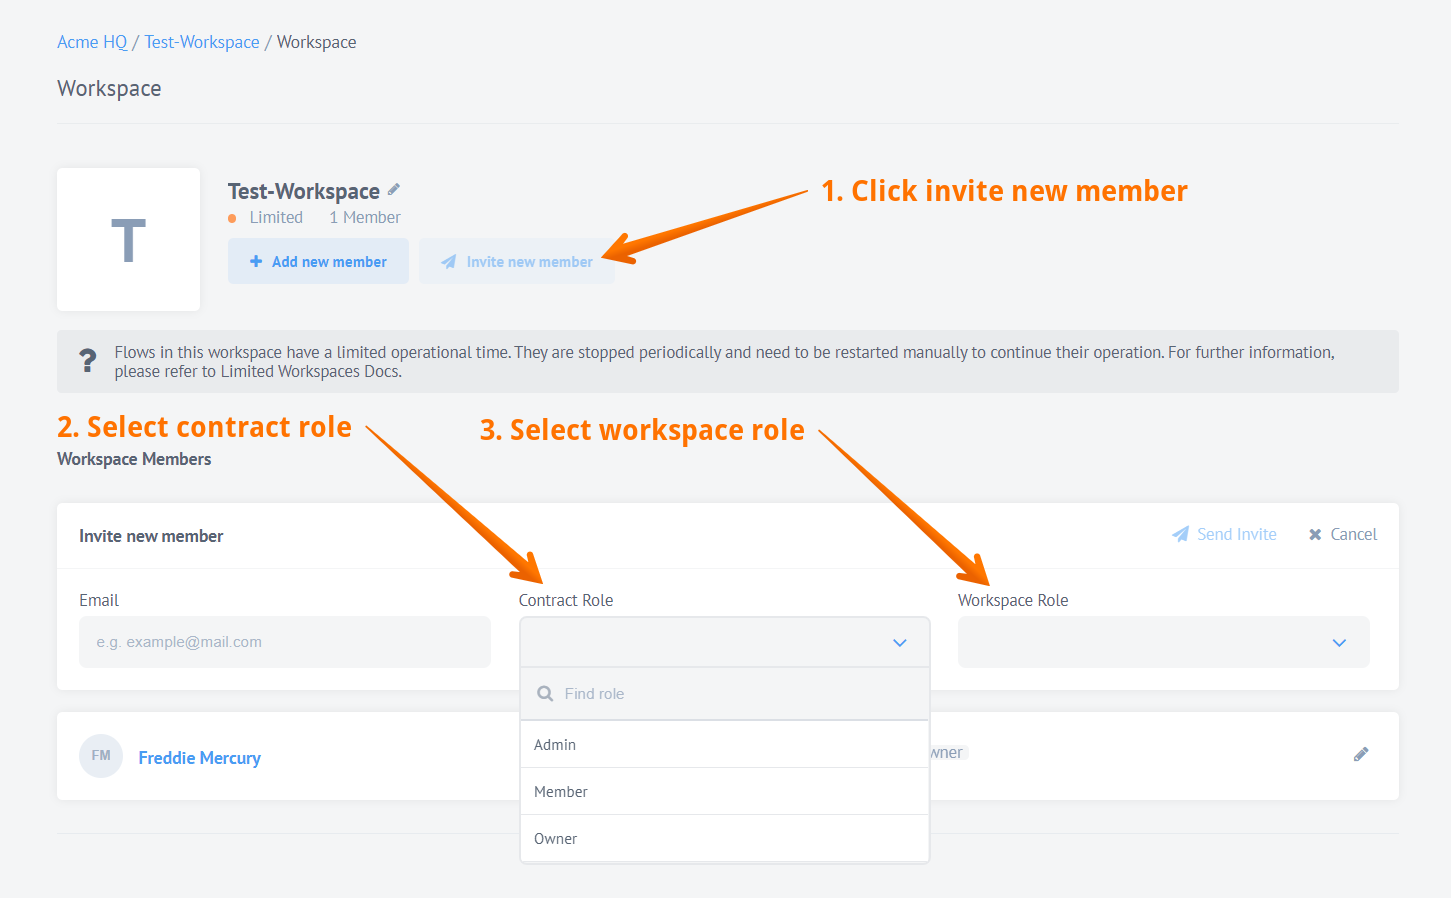
As a workspace Owner and Admin you can set the user role while inviting them to the Contract and Workspace.
Please Note: You can invite to Contract and Workspace only if your have Owner role in the contract.
Click Invite new member, enter user email and use Contract Role and Workspace Role drop-down menus. In the corresponding menu, select the required role. If your tenant has an extensive list of roles, use the Find role field to optimize search. Start typing to gradually filter out unwanted roles.
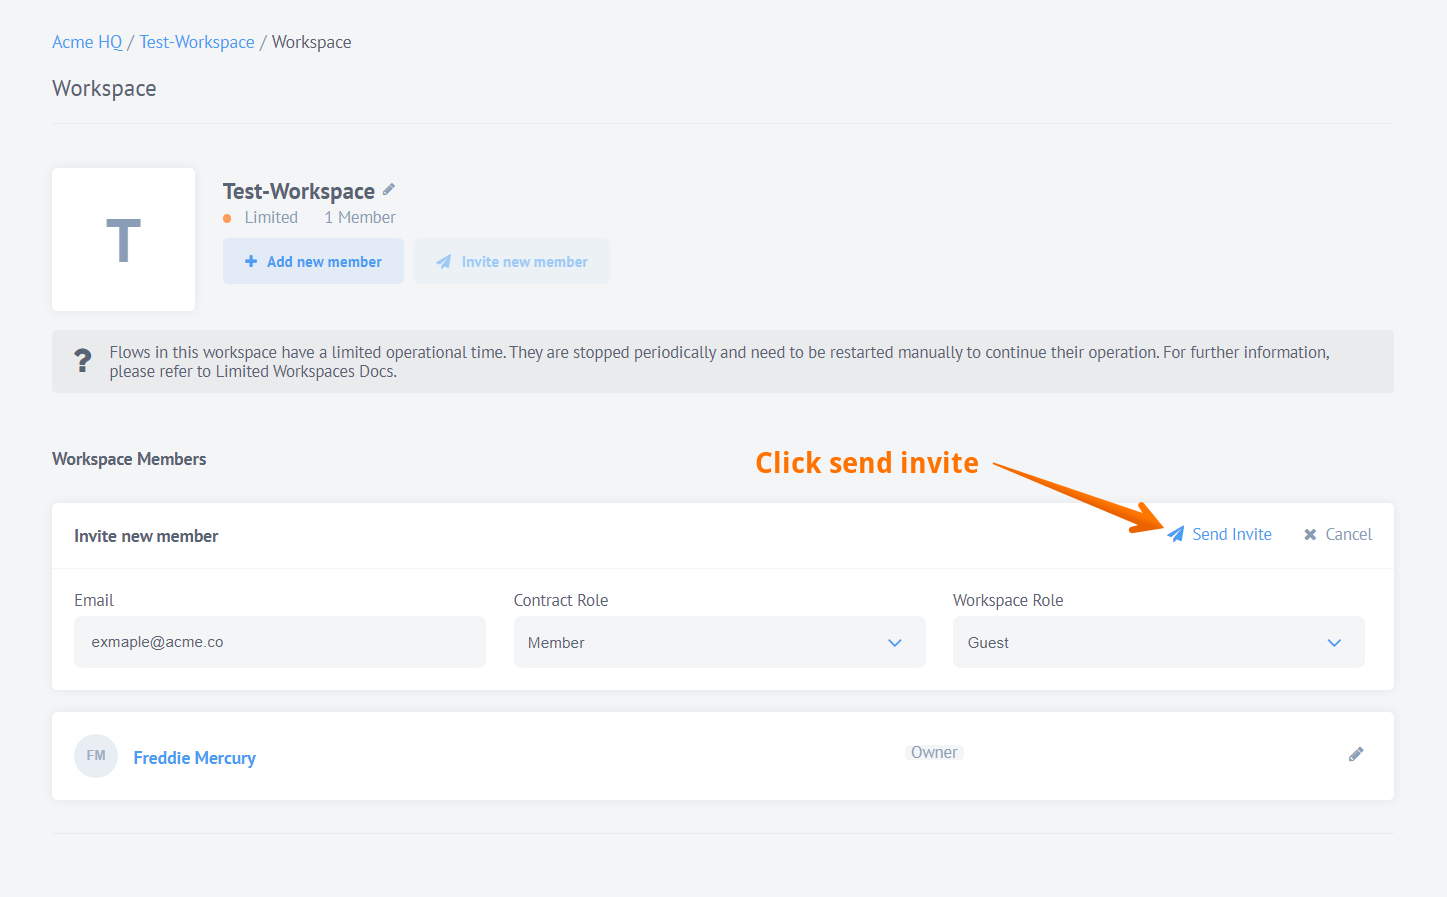
Click Send Invite to finish.
Setting user roles in Contract
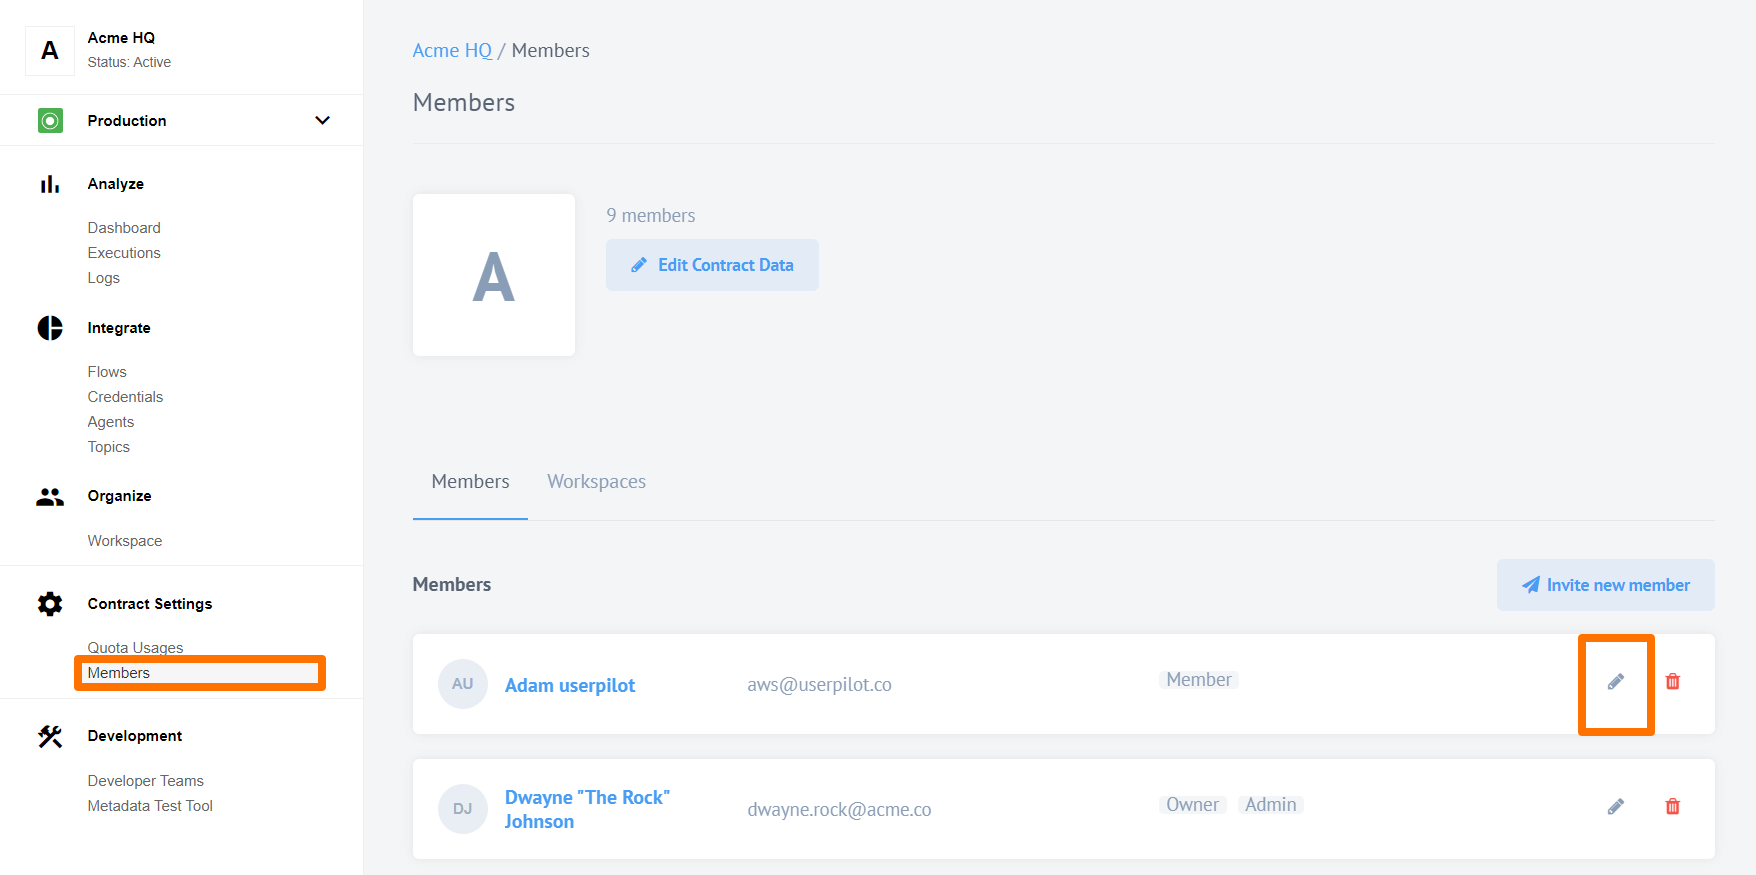
As a contract Owner you can modify roles of any user in the contract by visiting Members section of the Contract Settings and clicking to edit (the pencil).
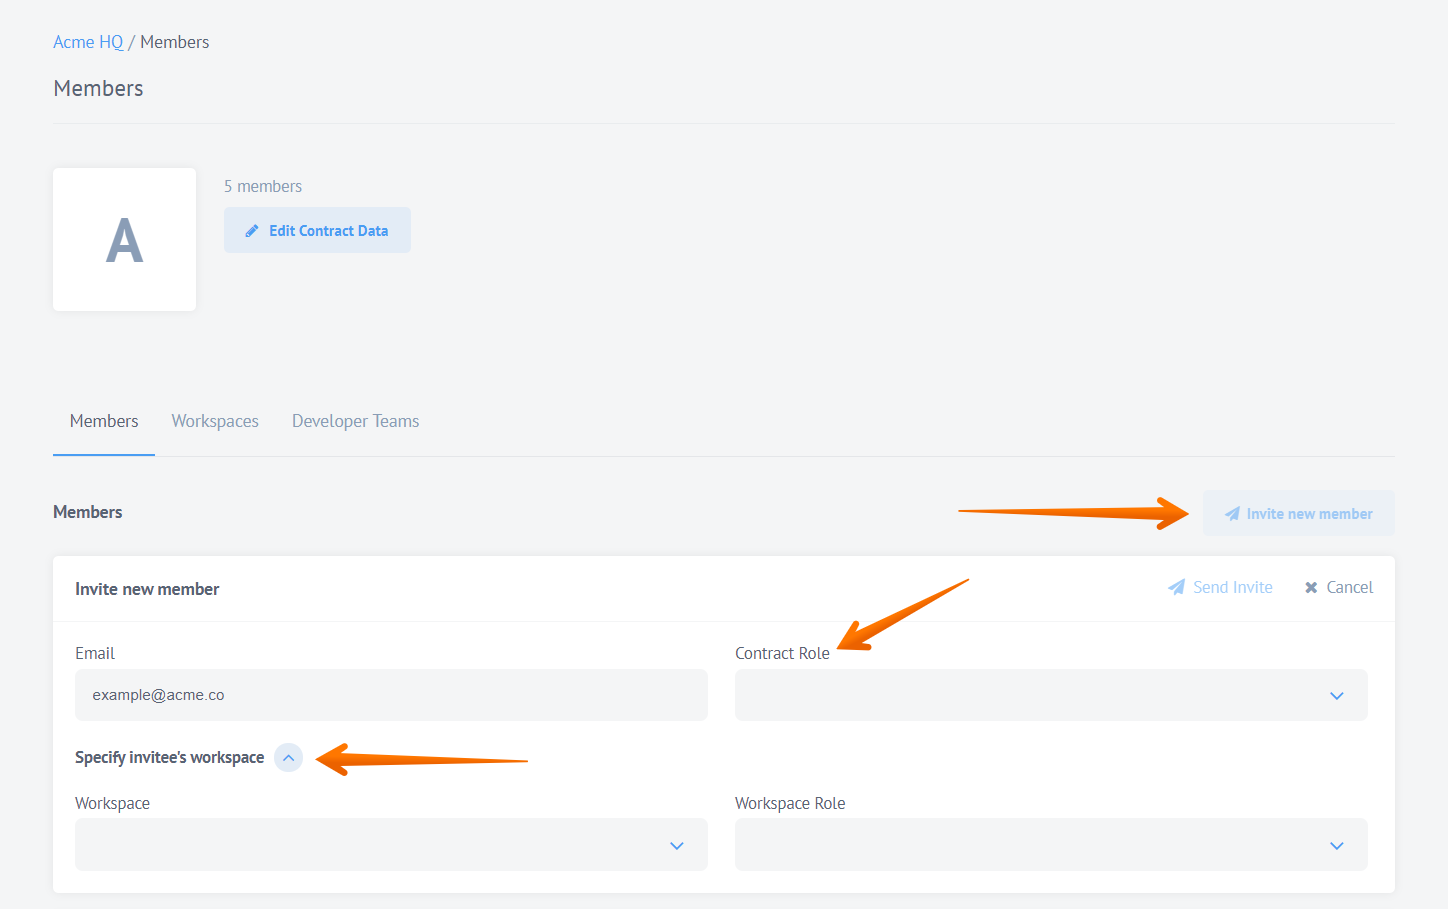
As a contract Owner or Admin you can set the user role while inviting to the Contract. Click on Invite new member button and start filling in the form.
- Select the Contract Role drop-down menu to set the contract role, then
- Select the Specify invitee’s workspace drop-down menu to add this person to a workspace,
- Select the Workspace Role drop-down menu to set the role in the workspace,
- Press on Send Invite to finish.
Couple of points to keep in mind:
- If you don’t have access to a particular workspace or your role is not Owner you can’t invite somebody else into this workspace.
- You can not invite anybody to the contract when you have Member role in that contract.
User Invitations
When you invite a user to join a Contract the platform generates a unique, one-time invitation token and sends it to email address you specify. The potential user clicks on the provided link including the one-time token. When the potential user clicks and joins your contract this token becomes invalid and can not be used anymore.
Delete Invitation
Sometimes, you send an invitation by mistake or would like to withdraw your invitation for some reason. You can delete the invitation by visiting Members section of the Contract Settings, scrolling down to find the list of Pending Members and clicking on delete icon:
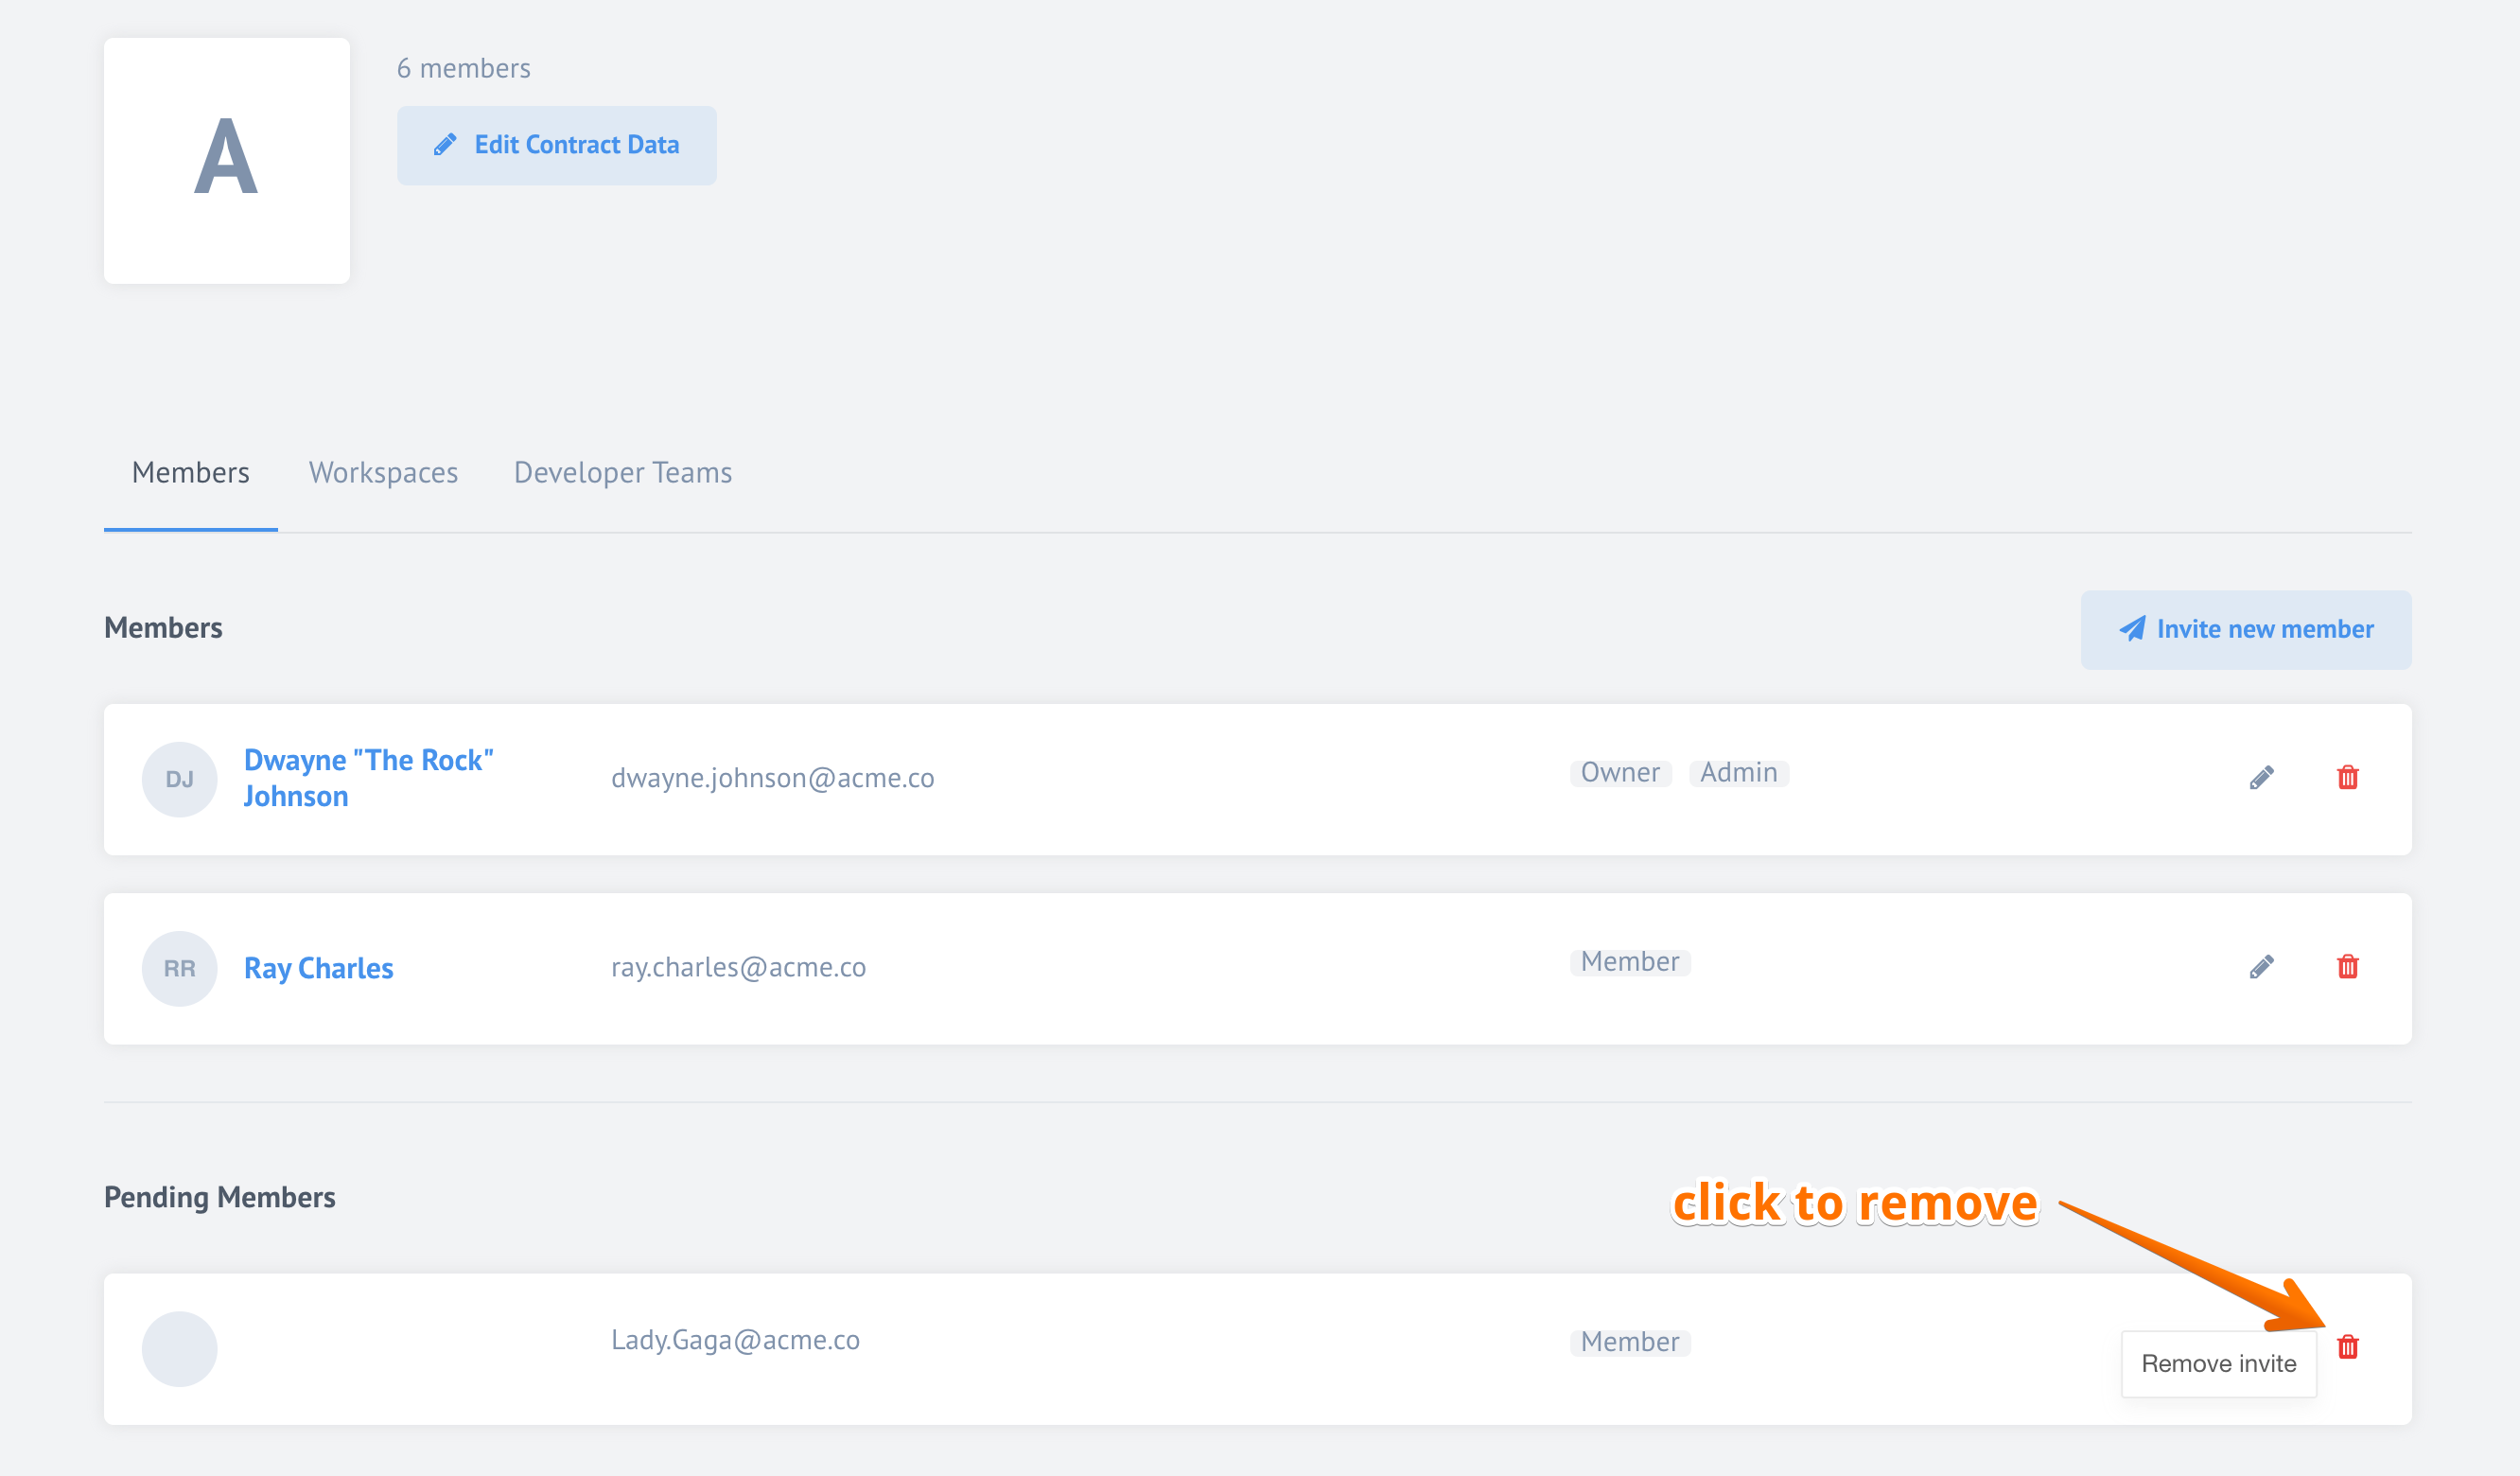
Please Note Only contract Owner and Admin role holders can perform this operation.
You can also delete invitation using a HTTP DELETE method to call our API
/v2/contracts/{CONTRACT_ID}/invites/{INVITE_ID} endpoint if you have contract Owner and Admin role. Check our
API documentation for more details.
After deleting the invitation if your user tries to use the link in invitation email to join, he/she will get an error Invite is not found or no longer valid.
Update Invitations
As a contract Owner and Admin you can update already sent but not accepted
invitations using a HTTP PATCH method to call our API /v2/contracts/{CONTRACT_ID}/invites/{INVITE_ID} endpoint.
You can update or remove roles you granted to this potential user and more. Check our
API documentation for more details.
Create Custom User Roles
Please Note: You MUST have the Service Account credentials to create custom user roles.
You can create your own Custom User Roles. To do so, make a request listing the list of permissions required for the role. The process is described below in detail.
Process
Let’s understand the process of creating a Custom User Role using the Operator for workspace Scope role as an example. Operator will have slightly more permissions than Guest, but less than Integrator.
1. First, we will need to get a list of all current roles on Tenant. To do this, do a GET request at https://api.thatapp.io/v2/tenants/{YOUR_TENANT_ID}/roles.
In response, you will receive a complete list of roles for both Scopes: contracts and workspaces:
{
    "data": {
        "id": "{YOUR_TENANT_POLICY_ID}",
        "type": "tenant-policy",
        "attributes": {
            "roles": [
                {
                    "i18n": {
                        "en": "Admin"
                    },
                    "role": "admin",
                    "permissions": [
                        "contracts.workspace.create",
                        "contracts.workspace.listAll",
                        "contracts.workspace.delete",
                        "contracts.repository.edit",
                        "contracts.devTeam.edit",
                        "global.auth_clients.create",
                        "global.auth_clients.get",
                        "global.auth_clients.edit",
                        "global.auth_clients.delete"
                    ],
                    "scope": "contracts"
                },
                ...
                {
                    "i18n": {
                        "en": "Guest"
                    },
                    "role": "guest",
                    "permissions": [
                        "global.auth_clients.get",
                        "workspaces.auth_secret.get",
                        "workspaces.logs.read_all",
                        "workspaces.vpn_agent.get",
                        "workspaces.topic.get"
                    ],
                    "scope": "workspaces"
                }
            ]
        }
    }
}
2. After that, form the object of the future role. Operator will be a Super-guest. It will be able to view and edit credentials, and run flows, but unlike the Integrator role cannot modify flow structures.
Please Note: You can find list of available permission with GET request for the
https://api.thatapp.io/v2/permissions
According to the goal, collect the necessary permissions and form an object:
{
    "i18n": {
        "en": "Operator"
    },
    "role": "operator",
    "permissions": [
        "workspaces.auth_secret.get",
        "workspaces.auth_secret.get_credentials",
        "workspaces.auth_secret.refresh",
        "workspaces.credential.edit",
        "global.auth_clients.get",
        "workspaces.logs.read_all",
        "workspaces.flow.toggleStatus",
        "workspaces.flow.toggleRealtime"
    ],
    "scope": "workspaces"
}
3. Based on the previously obtained data, assemble the body of the next query. Let’s take the body obtained at step 1, with all existing roles and insert object formed at step 2 in the roles array.
The following body is obtained:
{
    "data": {
        "type": "tenant-policy",
        "attributes": {
            "roles": [
                {
                    "i18n": {
                        "en": "Operator"
                    },
                    "role": "operator",
                    "permissions": [
                        "workspaces.auth_secret.get",
                        "workspaces.auth_secret.get_credentials",
                        "workspaces.auth_secret.refresh",
                        "workspaces.credential.edit",
                        "global.auth_clients.get",
                        "workspaces.logs.read_all",
                        "workspaces.flow.toggleStatus",
                        "workspaces.flow.toggleRealtime"
                    ],
                    "scope": "workspaces"
                },
                {
                    "i18n": {
                        "en": "Admin"
                    },
                    "role": "admin",
                    "permissions": [
                        "contracts.workspace.create",
                        "contracts.workspace.listAll",
                        "contracts.workspace.delete",
                        "contracts.repository.edit",
                        "contracts.devTeam.edit",
                        "global.auth_clients.create",
                        "global.auth_clients.get",
                        "global.auth_clients.edit",
                        "global.auth_clients.delete"
                    ],
                    "scope": "contracts"
                },
                ...
}
Please Note: The request does not need to use some of the fields received in response to a GET of this object, such as
id,relationships,meta,links.
4. Now let’s make a PATCH request for the https://api.thatapp.io/v2/tenants/{YOUR_TENANT_ID}/roles with the body formed in step 3.
As a result, we have a special role with a specific set of action permissions for the Workspaces scope. Now we can assign this role in the UI in the Workspace page:
